How to sew a quilted fabric backpack - tutorial and PDF pattern
- Sonia
- 28 mars 2025
- 5 min de lecture
Dernière mise à jour : 14 avr. 2025
In this tutorial, I show you how to make a pretty quilted fabric backpack. The bag has inside and outside pockets and its lining is simple to make, as it doesn't have a bias.
Before starting
Download the backpack PDF sewing pattern
To follow this tutorial, you can download the quilted fabric backpack pattern in PDF from our store. All the instructions for printing, cutting and assembling the parts of the pattern are included in the PDF.
Supplies to make the backpack
To make this project, you'll need:
a 95cm x 80cm (37 1/2 in x 31 1/2 in) quilted cotton or nylon fabric for the outside of the bag;
a 95cm x 110cm (37 1/2 in x 43 1/2 in) lightweight cotton or nylon fabric for the lining;
a 57cm (22 1/2 in) long zipper;
a 29cm (11 3/8 in) long zipper;
two 3cm (1 3/16 in) wide sliding buckles;
a 3cm (1 3/16 in) wide, 2.75m (2.2yards) long strap;
two pieces of elastic 8mm (3/8 in) wide and 14 cm (5 1/2 in) long.
Making the backpack
All the steps to make the backpack are explained in this tutorial, and are also available in the following video:
Step 1: preparing the pieces
Fold the outer fabric and cut the pattern pieces as shown on the cutting layout.


Before removing the patterns, transfer the important markings to the fabrics.
Cut the lining pieces in the same way as for the outer fabric.


Step 2: making the lining
Fold the lining pocket in half wrong side on wrong side
and topstitch the top 5mm (³⁄₁₆in) from the edge.


Place the pocket on the face of the bag (lining) right sides together and stitch the 3 sides 5mm (³⁄₁₆in) from the edge.


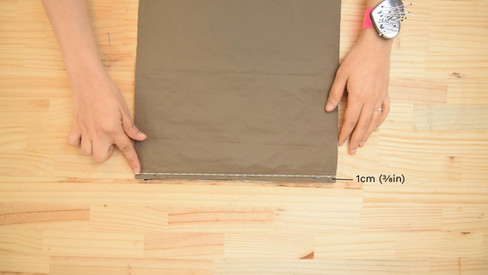
Grab the two lining pieces of the upper perimeter of the bag.
Make marks 1cm (⅜in) from one of the long sides of the pieces.
Iron to the back.


Place each side of the upper perimeter on the lower perimeter, right sides together.
Stitch the short sides 1cm (⅜in) from the edge.


Press the seams downwards.


Mark the middle of the bag faces (lining) and those of the perimeter.
Place one side of the perimeter on one face of the bag, right sides together, matching the markings.
Stitch all around 1cm (⅜in) from the edge.


Place the second side of the perimeter on the second face, right sides together, matching the markings.
Stitch all around 1cm (⅜in) from the edge.


Clip around the rounded edges of the bag.
Flip the lining right side out.


Step 3: making the side pockets
Place the side pocket linings, right sides together, on the outer fabric, matching the center markings.
Stitch the top and bottom 1cm (⅜in) from the edge.


Flip the pieces right side out.
Topstitch 5mm (³⁄₁₆in) from top edge and stitch 1cm (⅜in) from the topstitch.


Using a cord threader, pass the elastic through the resulting runner,
pin the ends of the elastic on either side of the runner and stitch 5mm (³⁄₁₆in) from the edge.


Step 4: making the perimeter
Place the side pockets on the bottom perimeter of the bag, wrong side on right side, placing the base of the pocket on the perimeter mark.
Stitch the 3 sides of each pocket 5mm (³⁄₁₆in) from the edge.


Take the two pieces of the outer fabric top perimeter and the 57cm (22 1/2 in)-long zipper.
Mark the centers of the zipper and the perimeter pieces.
Place one side of the perimeter on one side of the zipper, right sides together, matching the middles.
Place the second side of the perimeter on the second side of the zipper, right sides together, matching the middles.
Stitch each side 1cm (⅜in) from the edge.


Flip the pieces to the right side and topstitch 5mm (³⁄₁₆in) from the edge.
Trim off the excess zipper.
Using a pair of pliers, remove the zipper teeth 1cm (⅜in) from each side.


Place the top perimeter on the bottom perimeter right sides together and stitch each end 1cm from the edge.


Step 5: making the bag faces
Place one end of the 29cm (11 3/8 in) zipper between a tab and its lining right sides together well in the middle, and stitch 1cm (⅜in) from the edge.
Do the same with the second end.


Flip the tabs right side out and topstitch 5mm (³⁄₁₆in) from the edge.


Take the lower part of the face and the lining fabric of the pocket.
Mark the center of the zipper and the fabric pieces.
Place the zipper on the top edge of the face right sides together, then place one end of the pocket fabric right sides together over it and stitch 1cm (⅜in) from the edge.


Flip right side out and topstitch 5mm (³⁄₁₆in) from the edge.


Fold the pocket fabric over the back of the zipper, right side on wrong side.
On the right side, place the top face piece over the bottom face piece, right sides together.
Pin and stitch 1cm (⅜in) from the edge.


Flip right side out and topstitch 5mm (³⁄₁₆in) from edge.


Cut a piece of webbing 25 cm (10in) long and two pieces 1m (39 3/8in) long each.
Fold the 25cm (10in) piece of webbing in half and place each end on either side of the top center of the back face, right sides together.
Place the 1m (39 3/8in) long straps on either side of the 25cm (10in) strap, then stitch 5mm (³⁄₁₆in) from the edge.


Cut two 25cm (10in) long pieces of webbing.
Pass each strap through a sliding buckle, then fold the strap in half.
Place the strap over the middle of the triangle on the bag's tab, right sides together, from the tip of the triangle to the back.
Fold the triangle in half, right sides together, and stitch the back side 1cm (⅜in) from the edge.


Flip the tabs right side out, pulling on the webbing.
Trim off any excess fabric.
Place the tabs on their locations on either side of the back face of the bag right sides together and stitch 5mm (³⁄₁₆in) from the edge.


Pass the free sides of the straps through the sliding buckles.
Fold the ends over 2 cm (¾in) and stitch in the middle.


Step 6: bag assembly (outer fabric)
Mark the middles of the bag's perimeter and faces.
Place the perimeter on the bag face right sides together, matching the markings.
Stitch all around 1cm (⅜in) from the edge.


Open the zipper and place the second face on the second side of the perimeter.
Stitch all around 1cm (⅜in) from the edge.


Clip the rounded edges of the bag.


Step 7: attach the lining to the outside
Slide the bag into the lining, wrong sides together, center the faces and sides.
Attach the lining to the outer fabric using an invisible stitch.
Flip the bag right side out.


Your bag is ready.


