How to sew a lace shoulder bag with a ruched strap & a bow - tutorial and PDF pattern
- Sonia
- May 16, 2025
- 8 min read
Looking for a fun sewing project that’s both stylish and easy to make? You’re in the right place!
In this tutorial, I’ll show you how to create a lace shoulder bag with a pretty beaded handle, a gathered detachable strap, a cute decorative bow, and even two inner pockets to help keep your things organized. The main compartment closes with a zipper to keep everything safe.
You don’t need to be an expert — this project is perfect for beginners and intermediate sewists alike. I’ll guide you step by step with clear written instructions and a complete video tutorial to follow along easily.
You can also get the printable PDF sewing pattern to save time and make cutting your fabric a breeze.
Ready to make your own charming handmade bag? Let’s get started!

Before starting
The shoulder bag sewing pattern
To follow the tutorial, you can download the shoulder bag sewing pattern in PDF from our store. All instructions for printing, cutting and assembling the pieces are available in this vidéo and included in the pattern PDF.
Supplies to make the bag
To make this project, you'll need:
Outer Fabric: Cotton canvas fabric (If your fabric lacks structure, you can interface it.), 38 cm x 64cm (15 in x 25 in).
Lace Fabric: 55 cm x 76 cm (21 ½ in x 30 in).
Lining Fabric: Lightweight cotton, 38 cm x 64 cm (15 in x 25 in).
Fabric for the Bow: Organza for the bow, 64 cm x 48 cm (25 ¼ in x 19 in).
Zippers: One zipper, 18 cm (7 ⅛ in) long (Cut the zipper to the correct length, if needed).
Strap: One strap, 3 cm (1 ¼ in) wide and 60 cm (23 ½ in) long.
Hardware:
Two swivel hooks, 3 cm (1 ¼ in) wide.
Two rings, 3 cm (1 ¼ in) wide.
Two small swivel hooks, 1 cm (⅜ in) wide.
7 beads, 20 mm (4/5 in) in diameter, and 10 beads, 16 mm (5/8 in) in diameter.
Nylon thread for the beads, about 35 cm (14 in) long.
Making the lace bag
All the steps to make the bag are explained in this tutorial (and the PDF accompanying the pattern), and are also available in the following video:
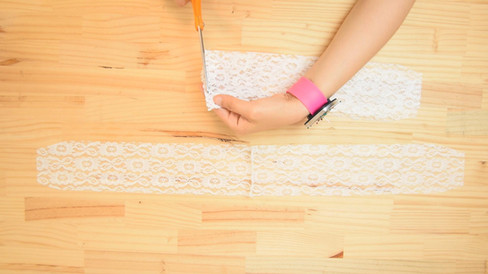
Step 1: cutting and preparing parts
Cut the outer bag pieces from the canvas.
Fold the fabric in half and lay out the pattern pieces according to the cutting layout.


Before removing the pattern pieces, transfer all important markings onto the fabric.


Do the same to cut the pieces from the lace.


Repeat the process with the lining fabric.


Cut the bow pieces from the organza.


Step 2: making the bow
Take one of the bow loop pieces.
Fold it in half lengthwise, right sides together.
Stitch along the long edge, 1 cm (3/8 in) from the edge.


Trim the seam allowance to about 5 mm (3/16 in).
Turn the piece right side out and position the seam in the center.
Press carefully.


Next, fold the piece in half widthwise, aligning the open edges.
Stitch 1 cm (3/8 in) from the edge.


Trim the seam allowance again to about 5 mm (3/16 in).
Turn the piece so that the seam is on the inside and center it.
Make the second bow loop the same way.


Take one of the bow tail pieces.
Fold it in half lengthwise, right sides together.
Stitch along three sides, 1 cm (3/8 in) from the edge, leaving a 2 cm (3/4 in) opening in the center for turning.


Clip the corners and trim the seam allowances to about 5 mm (3/16 in).
Turn the piece right side out through the opening and press it carefully.


Close the opening using an invisible hand stitch.
Repeat the same steps for the second bow tail.


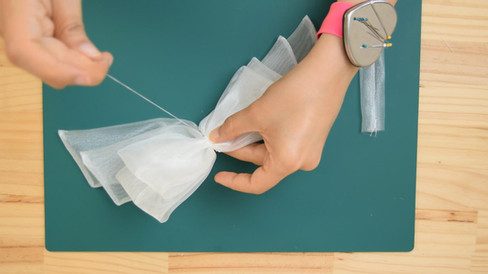
Take the center bow piece.
Fold it in half lengthwise, right sides together.
Stitch along the long edge, 1 cm (3/8 in) from the edge.


Trim the seam allowance to about 5 mm (3/16 in).
Turn the piece right side out and center the seam. Press carefully.


Place the small loop on top of the large loop, aligning and centering the seams.
Using a needle, pass a thread through the center of the loop and gently pull to gather it.
Wrap the thread around the loop and make a few stitches to secure the gathers.


Do the same by placing the small bow tail on top of the large one, keeping them well centered, then repeat the gathering process with thread and secure it the same way.


Place the bow tails behind the loop, well centered.
Attach them by hand with a few stitches.


Finally, position the center piece of the bow around the loop.
Overlap its ends at the back of the bow.
Stitch them as close to the center as possible.


Trim the seam allowances.
Turn the bow center so the seam is hidden inside.


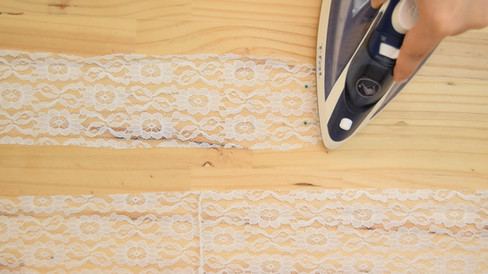
Step 3: preparing the outer pieces
Take the two bag face pieces, in canvas and lace.
Place each lace piece on top of a canvas piece, wrong side of the lace against right side of the canvas.
Stitch all around, 5 mm (3/16 in) from the edge, to hold them together.


Do the same with the two perimeter pieces as well as the zipper tabs.


Step 4: making the lining pocket
Fold the pocket piece in half, wrong sides together.
Topstitch the upper edge 5 mm (3/16 in) from the edge.


Next, position the pocket on one of the bag face linings, right sides together.
Stitch along three sides, 5 mm (3/16 in) from the edge.
Sew a vertical line down the center of the pocket to divide it into two compartments.


Step 5: making the zipper
Insert one end of the zipper between a tab and its lining, right sides together, centered.
Stitch 1 cm (3/8 in) from the edge.
Repeat the process for the other end.


Turn the tabs right side out.
Topstitch all around at 5 mm (3/16 in) from the edge.


Step 6: attaching the bag faces to the zipper
Take the two bag face pieces (outer and lining) and the zipper.
Mark the centers of the bag faces and the zipper.
Place the zipper right sides together along the top of the outer bag face.
Then place the lining on top, right sides together, centered.
Stitch 1 cm (3/8 in) from the edge.


Repeat the process for the second side of the zipper and the other bag face.


Clip the curves at the top of the bag.
Turn the pieces right side out and topstitch on both sides of the zipper, 5 mm (3/16 in) from the edge.
If the tabs stick out slightly from the ends of the bag, you can trim them to even everything out.


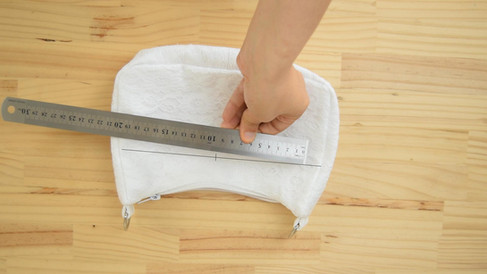
Step 7: making the perimeter
Take the two perimeter pieces in lining fabric.
Place them right sides together, aligning the center points,
and sew the bottom edge with a 1 cm (3/8 in) seam allowance.
Press the seam.


Do the same with the two perimeter pieces in outer fabric: place them right sides together, align the centers, and stitch the bottom edge with a 1 cm (3/8 in) seam allowance.
Press the seam.
Topstitch on both sides of the seam, 5 mm (3/16 in) from the seam line.


Step 8: assembling the bag
Fold the bag with outer fabric against outer fabric and lining against lining.
Open the zipper.


Place one side of the outer perimeter piece against the edge of one outer bag face, right sides together, aligning the notches.
Clip the perimeter to help it curve smoothly, then pin in place.
Sew with a 1 cm (3/8 in) seam allowance.


Pin the other side of the outer perimeter to the second outer bag face, right sides together, aligning the notches.
Sew with a 1 cm (3/8 in) seam allowance.


Repeat the same steps with the lining perimeter: place one side against a lining face, right sides together, aligning the notches.
Clip the perimeter to match the curves, then stitch with a 1 cm (3/8 in) seam allowance.
Do the same with the other side of the lining perimeter and the second lining face, clipping the curves as needed.
Stitch with a 1 cm (3/8 in) seam allowance, leaving an opening of about 10 cm (4 in) for turning the bag right side out.


Clip all the curved edges of the bag.


Step 9: making the strap loops
Take the two strap loop pieces in lace.
Place them right sides together
and stitch the two long sides with a 1 cm (3/8 in) seam allowance.
Do the same with the second pair.


Trim the seam allowances to 5 mm (3/16 in), then turn the pieces right side out.


Cut two pieces of strap, each 5 cm (2 in) long, and insert them into the lace tubes.
Slide each strap piece through a ring, then fold the strap in half.


Insert one folded strap into the opening at one end of the bag (outer fabric, right sides together).
Insert the second strap into the opening at the other end.
Pin the lining, outer fabric, and strap together, then stitch all layers with a 1 cm (3/8 in) seam allowance.


Trim the corners at both ends of the bag.
Turn the bag right side out through the opening in the lining.
Close the lining opening with a stitch 2 mm (1/16 in) from the edge.


Step 10: making the strap
Take two lace strap pieces.
Place them right sides together, aligning the center points.
Sew the bottom edge with a 1 cm (3/8 in) seam allowance.


Trim the seam allowance to 5 mm (3/16 in).

Measure 1 cm (3/8 in) at each end of the pieces, fold this amount to the inside, and press to hold the fold.
Also press the center seam.
Repeat the same process with the second pair.


Place the two assembled pieces right sides together, aligning the centers, and stitch the long sides with a 1 cm (3/8 in) seam allowance.
Turn the entire piece right side out through the open ends.


Cut a piece of webbing 48 cm (19 in) long.
Insert it inside the lace tube.


Pass one end of the webbing through a swivel hook, fold it over by about 2 cm (3/4 in),
and sew as close as possible to the hook.
Repeat on the other side.


Slide the lace tube so it covers the strap up to the hook.
Stitch 5 mm (3/16 in) from the edge to hold it in place.


Step 11: making the beaded handle
Take 10 beads that are 16 mm (5/8in) in diameter and 7 beads that are 20 mm (4/5in) in diameter.
Tie a strong thread to a small swivel hook, then string 5 of the 16 mm (5/8in) beads, followed by the 7 beads of 20 mm (4/5in), and finally the remaining 5 beads of 16 mm (5/8in).
Attach the second swivel hook to the other end of the thread.


Step 12: attaching the bow to the bag
Mark a point at the center of the bag, 4.5 cm (1 3/4in) from the top edge.
Place the center of the bow on this point, then use a needle and thread to stitch it to the outer fabric of the bag, without sewing through the lining.


Step 13: attaching the strap and beaded handle
Attach both the strap and the beaded handle to the rings on the bag.


Your bag is finished!


Comments