How to sew a quilted travel bag with a trolley sleeve - tutorial and PDF pattern
- Sonia
- Mar 7, 2025
- 7 min read
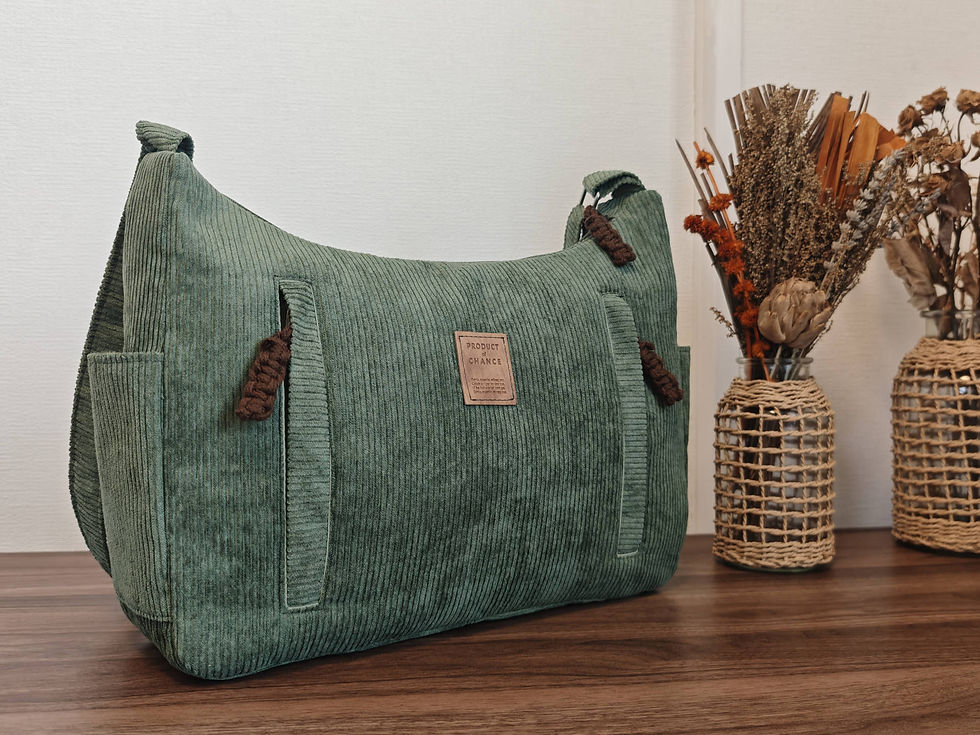
In this tutorial, I'll show you how to make a quilted travel bag with inside and outside pockets and a trolley sleeve.
This bag can be used as a travel bag as a gym bag or even as a diaper bag.
I'll guide you through the sewing process, step by step, to help you create your very own travel bag.
Before starting
To follow the tutorial, you can download the quilted travel bag pattern in PDF from our store. All the instructions for printing, cutting and assembling the pieces are included in the PDF of the pattern.
Supplies to make the bag
To make this project, you'll need:
a 140 cm x 95 cm (1.5 yard x 1 yard) lightweight cotton fabric for the outside;
a 110 cm x 95 cm (1.2 yard x 1 yard) lightweight cotton fabric for the lining;
140 cm x 95 cm wadding for quilting;
one 43 cm (17 in) zipper;
one 21 cm (8 ¼ in) zipper;
a 3.5 cm (1 ⅜ in) wide and 2 m (2.2 yards) long strap;
two pieces of webbing 2.5 cm (1 in) wide and 15 cm (6 in) long;
two 2.5 cm (1 in) wide rings.
Making the bag
All the steps involved in making the bag are explained in this tutorial (and the PDF accompanying the pattern), and are also available in the following video:
Step 0: Quilting the fabric
Place the outer fabric on the batting, back to back.
Sew parallel lines 1.5 cm (⅝ in) apart.


Step 1: Cutting and preparing parts
Place the pattern pieces on the outer fabric as shown in the cutting diagram and cut.
Cut the pieces.


Cut the tabs for the two zippers and the ribbon from a piece of unquilted outer fabric.


Do the same for the lining.


Before removing the patterns, transfer the markings to the fabrics.


Step 2: Making the straps
Take two strips of fabric 5 cm (2 in) wide by 1 m (1.1 yards) long and two other strips of fabric 4 cm (1 ⁹⁄₁₆ in)wide by 15 cm (6 in) long.
Fold the sides of the fabric strips over 1 cm (⅜ in) on either side of the long sides.
Iron to hold in place.


Place the two small strips of fabric on the two small pieces of 2.5 cm (1 in) by 15 cm (6 in) long strap, right in the middle.
Stitch both sides 2 mm (⅛ in) from the edge.


Cut the long strap into two pieces of 3.5 cm (1 ⅜ in) wide and 1 m (1.1 yards) long.
Place the two long strips of fabric on the two long pieces of 3.5 cm (1 ⅜ in) x 1 m (1.1 yards) strap, right in the middle.
Stitch both sides 2 mm (⅛ in) from the edge.


Step 3: Creating the bag sides
Place the linings over the side pockets right sides together.
Stitch the top 1 cm (⅜ in) from the edge.


Flip the lining to the wrong side of the outer fabric so that the base of the lining sits on top of the base of the outer fabric.
Stitch all around at 5 mm (³⁄₁₆ in) from the edge.
Then topstitch the top of the pocket at 5 mm (³⁄₁₆ in) from the edge and 5 mm (³⁄₁₆ in) from the seam between the lining and the outer fabric.


Take the outer fabric from one side of the bag, along with one of the small straps and a buckle.
Mark the middle of the side of the bag and then make a mark 9 cm (3 ⅝ in) from the top of the piece.
Pass the strap through the buckle. Fold the strap so that the back is 5.5 cm (2 ¼ in) long from the top and 2 cm (¾ in) long from the bottom.
Place the strap on top of the previously marked reference in the middle and stitch a rectangle 3 cm (1 ³⁄₁₆ in) high and 2 cm (¾ in) wide.


Place the pocket on the side of the bag, wrong side on right side in the middle, and stitch the 3 sides 5 mm from the edge.
Do the same with the second side.


Step 4: The faces of the bag
Place the lining over the front pocket right sides together and stitch the top 1 cm (⅜ in) from the edge


Flip the lining over to the wrong side of the outer fabric so that the base of the lining sits on top of the base of the outer fabric.
Stitch all around 5 mm (³⁄₁₆ in) from the edge.
Then topstitch the top of the pocket 5 mm (³⁄₁₆ in) from the edge and 5 mm (³⁄₁₆ in) from the seam between the lining and the outer fabric.


Mark the middle of the bag face.
Place the pocket on the bag face right sides together.
Stitch the 2 sides 5 mm (³⁄₁₆ in) from the edge.


Using the pattern, mark the location of the strap.
Then place it in position and stitch a rectangle 3 mm (⅛ in) from the edge.


Place one end of the small zipper between a tab and its lining, right sides together, and stitch 1cm (⅜ in) from the edge.
Do the same with the second end.


Flip the tabs right side out and topstitch all around, 2 mm (¹⁄₁₆ in) from the edge.

Mark the zipper middles.
Place the zipper on top of the outside of the back pocket piece, right sides together.
Then place the back pocket lining on top, right sides together, right in the middle.
Stitch 1cm (⅜ in) from the edge.
Do exactly the same with the second side of the zipper and the second back pocket piece.


Flip the fabric right side out, and topstitch 5 mm (³⁄₁₆ in) from the edge.


Fold the pocket outside on outside and lining on lining.
Stitch the bottom of the lining and the bottom of the outer fabric 1 cm (⅜ in) from the edge.


Flip the pocket right side out.
Using the pattern, mark the pocket location and place it in position.
Stitch both sides 5 mm (³⁄₁₆ in) from the edge.


Still using the pattern, mark the location of the strap.
Then place it on its location and stitch a rectangle 3 mm (⅛ in) from the edge.
Place one end of the large zipper between a tab and its lining, right sides together.
Stitch 1 cm (⅜ in) from the edge.
Do the same with the second end.


Flip the tabs right side out and topstitch all around, 2 mm (³⁄₁₆ in) from the edge.


Mark the zipper middle.
Place the zipper on the top of the outside of the bag face right sides together in the middle.
Stitch 1 cm (⅜ in) from the edge.


Flip the fabric right sides out, and topstitch 5mm (³⁄₁₆ in) from the edge.
Do exactly the same with the second side of the zipper and the second face of the bag.


Step 5: Bag assembling
Mark the middle of the long sides of the bag base.
Place one side on the bottom of one face of the bag, right sides together, and the second side on the bottom of the second face of the bag.
Stitch both sides 1cm (⅜ in) from the edge.


Open the bag zipper.
Place a piece of the bag side on the side of the bag faces and bottom right sides together, matching the markings.
Stitch all around 1cm (⅜ in) from the edge.
Do the same with the second side.


Clip the rounded edges of the bag.


Step 6: Making the lining
Fold the pocket piece in half lengthwise, wrong sides together, and stitch the top 5mm (³⁄₁₆ in) from the edge.


Mark the center of the pocket as well as the center of one of the faces. Place the pocket on the face of the bag, right in the middle.
Stitch down the middle of the pocket.
Stitch the sides 5mm (³⁄₁₆ in) from the edge.


Make marks 3.5 cm (1 ⅜ in) either side of the pocket center and draw lines.
Fold the fabric so that the marked line lies on the center.


Mark 3.5 cm (1 ⅜ in) from the side seams and draw a line.
Fold the fabric so that the line lies on the side seam.


Iron to hold the pleats in place.
Stitch each pleat 5 mm from the edge.


Stitch the bottom of the pocket 5mm (³⁄₁₆ in) from the edge.


Mark 1cm (⅜ in) from the edge at the top of the bag face.
Fold the edge to the wrong side and iron to hold in place.
Do the same with the second face.


Mark the middle of the long sides of the bag base.
Place one side on the bottom of one face of the bag, right sides together, and the second side on the bottom of the second face of the bag.
Stitch both sides 1 cm (⅜ in) from the edge.


Mark the center of the bag sides.
On the top center, mark two marks 5 mm (³⁄₁₆ in) apart on either side of the center.
Place a piece from the side of the bag on the side of the bag faces and bottom right sides together, making the marks coincide.
The top of the face should stop at the mark 5 mm (³⁄₁₆ in) from the middle of the side.
Stitch all around, 1 cm (⅜ in) from the edge.
Do the same with the second side.


Slide the bag into the lining wrong sides together, positioning the faces and sides in the middle.
Attach the lining to the outer fabric using a slip stitch.


Step 7: Making the knot
Place the two bow pieces right sides together.
Stitch all around, 5mm (³⁄₁₆ in) from the edge, leaving a 2.5cm (1 in) opening to turn the piece over.


Turn the piece through the opening and press.
Stitch the opening 2mm (¹⁄₁₆ in) from the edge.


Attach the bow to the bag zipper.


Votre sac est prêt.


Comments