How to sew a quilted duffle bag with a trolley sleeve - tutorial and PDF pattern
- Sonia
- 19 avr. 2025
- 6 min de lecture
Dernière mise à jour : 30 avr. 2025
Need a bag that’s roomy, stylish, and travel-ready? This quilted duffle bag ticks all the boxes! It’s fully lined, has plenty of pockets, a secure zipper closure, and a trolley sleeve that slides right over your suitcase handle—making it perfect for travel, the gym, or even as a diaper bag.
In this tutorial, I’ll walk you through the full sewing process step by step. From cutting the pieces with the included PDF pattern to the final assembly—you’ll learn how to sew a beautiful, practical duffle bag you’ll love to carry.

Before starting
The travel bag pattern
To follow the tutorial, you can download the travel bag sewing pattern in PDF from our store. All instructions for printing, cutting and assembling the pieces are included in the pattern PDF.
Supplies to make the bag
To make this project, you'll need
outer fabric: lightweight cotton fabric, 100cm x 35cm (39 1/2in x 14in).
quilted outer fabric: quilted cotton fabric, 90cm x 65cm (35 1/2in x 25 1/2in).
lining fabric: lightweight cotton fabric, 120cm x 70cm (47 1/4in x 27 1/2in).
135 cm (53 1/4in) of piping.
a 2-meter (79in) long and 3.5 cm (1 3/8in) wide strap.
a 38 cm (15in) long zipper.
a 20 cm (8in) long zipper.
lightweight interfacing for the non-quilted outer pieces, 43cm x 31cm (17in x 12 1/4in).
Making the duffle bag
All the steps to make the bag are explained in this tutorial (and the PDF accompanying the pattern), and are also available in the following video:
Step 1: cutting and preparing parts
Fold the fabric and place the pattern pieces as shown on the cutting layout.
Cut from the quilted fabric: The front pocket, bag faces, base, and sides.


Cut from the lightweight cotton fabric: The remaining outer pieces.


Cut the lining: Fold the fabric into quarters for the main piece and the pocket.


Before removing the pattern pieces, transfer all important markings onto the fabric.


Cut the seam allowances for the pattern of the back pocket, side pockets and tabs.
then, use the patterns to cut the interfacing.
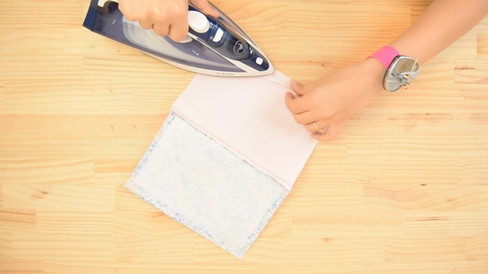
Interface the pieces.


Step 2: making the straps
Take the two embellishment strips.
Fold in 1 cm (⅜ inch) on both long edges
Press to hold in place.


Cut the strap into two 1-meter (39-inch) pieces.
Place the fabric strips centered on each strap.
Topstitch both sides 2 mm (⅛ inch) from the edges.


Step 3: creating the bag sides
Place the linings on the side pockets, right sides together.
Stitch the top edge with a 1 cm (⅜ inch) seam allowance.


Clip the curves at the top of the pocket.


Turn the lining to the wrong side of the outer fabric, press.
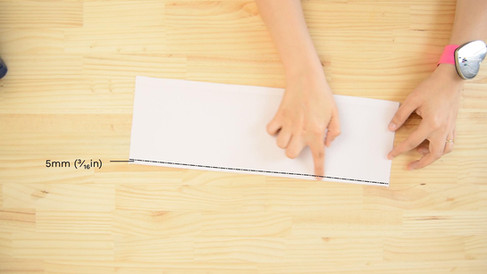
Topstitch the top edge at 5 mm (³⁄₁₆ inch).


Center the pocket on the side panel, wrong side of the pocket facing the right side of the panel.
Stitch it in place at 5 mm (³⁄₁₆ inch) from the edge.
Repeat for the other side panel.


To create a clean join for the piping, trim the inner cording on one end by 1.5 cm (5/8 in),
then fold the fabric casing inward to enclose the raw edge.


Position the piping on the right side of the fabric, aligning the raw edge of the piping with the raw edge of the fabric.


Cut the piping to match the perimeter of the bag side panel, leaving an additional 1.5 cm (5/8 in) for the join.
Overlap the folded end of the piping over the raw end, ensuring they align neatly.
Pin or clip the piping in place along the edge.
Sew around the perimeter using a zipper foot or a piping foot, stitching close to the cording.


Step 4: the main zipper
Place one end of the large zipper between a tab and its lining, right sides together.
Stitch with a 1 cm (⅜ inch) seam allowance.
Repeat for the other end.


Turn the tabs right side out and topstitch at 5 mm (⅛ inch) from the edge.


Step 5: the front pocket
Place the lining on the front pocket, right sides together.
Stitch the top edge with a 1 cm (⅜ inch) seam allowance.
Clip the curves at the top.


Turn the lining to the wrong side of the outer fabric
Topstitch the top edge at 5 mm (³⁄₁₆ inch).


Center the pocket on the bag front, wrong side of the pocket against the right side of the panel,
Stitch the three sides at 5 mm (³⁄₁₆ inch).


Step 6: the back pocket
Place one end of the small zipper between a tab and its lining, right sides together.
Stitch with a 1 cm (⅜ inch) seam allowance.
Repeat for the other end.


Turn the tabs right side out and topstitch at 5 mm (⅛ inch) from the edge.


Mark the center points of the zipper.
Place the zipper on the top of the outside of the back pocket piece, right sides together.
Then place the back pocket lining on top, right sides together, ensuring it is centered.
Stitch 1 cm (3/8 in) from the edge.


Fold the fabric to the right side and topstitch 5 mm (3/16 in) from the edge.
Do the exact same thing with the second side of the zipper and the second back pocket piece.


Fold the outer pocket fabric right sides together and the lining right sides together.
Stitch the bottom of the lining 1 cm (3/8 in) from the edge and the bottom of the outer fabric 1 cm (3/8 in) from the edge.


Press the seams.


Open the zipper to turn the pocket right side out.
Using the pattern, mark the pocket location and place it on the face panel.
Stitch both sides 5mm (³⁄₁₆ in) from the edge.


Step 7: bag faces panels
Mark the centers of the zipper and the face panel tops.
Align the zipper with the top of the face panel, right sides together.
Stitch with a 1 cm (⅜ inch) seam allowance.


Do the same for the other side of the zipper and the second face panel.


Turn the fabric right side out and topstitch at 5 mm (³⁄₁₆ inch).


Use the pattern to mark the strap placements on the face panels.
Stitch the straps in place, sewing a rectangle at 5 mm (⅛ inch) from the edges.


Step 8: bag assembly
Mark the center points of the long sides of the bag’s base.
Align one side of the base with the bottom edge of one face panel, right sides together, and the other side of the base with the bottom edge of the second face panel.
Stitch both sides with a 1 cm (⅜ in) seam allowance.


Mark the center points of the bag.
Open the bag's zipper.
Align one side panel with the edges of the face panels and the base, right sides together, matching the markings.
Stitch all around with a 1 cm (⅜ in) seam allowance.
Repeat the same process for the second side panel.


Step 9: creating the lining
Fold the pocket piece in half lengthwise, right sides together,
Stitch the bottom edge with a 1 cm (⅜ in) seam allowance.


Press the seam, then turn the pocket right side out.
Press the pocket flat
Topstitch along the top edge at 5 mm (⅛ in).


Using the pattern, mark the pocket placement on the lining.
Place the pocket on the lining, right sides together.
Stitch the three sides at 5 mm (⅛ in) from the edge.
Then, sew lines as indicated on the pattern to create divisions.


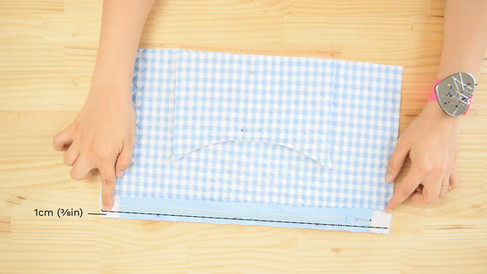
On the top edge of the lining, mark 1 cm (⅜ inch) from the edge.
Fold it to the wrong side, and press to hold in place.
Repeat this process for the second side of the lining.


Mark the center points of the bag's side panels.
At the top center of each side, mark two points 5 mm (³⁄₁₆ inch) on either side of the center.
Place one side panel of the lining against the bag face panel, right sides together, aligning the markings.
Ensure the top of the bag face aligns with the 5 mm (⅛ inch) markings on the side.
Stitch all around the edge with a 1 cm (⅜ inch) seam allowance.
Repeat the same steps for the second side panel.


Step 10: joining outer bag and lining
Clip the curves of both the outer fabric and the lining.
Turn the lining right side out.
Place the bag inside of it, wrong sides together.
Align the faces and sides carefully.
Secure the lining to the outer fabric using an invisible stitch.


Your bag is ready!


